
Without a shadow of a doubt… As a gardener, spring may be a very demanding season. So, to save you time and effort, I have compiled detailed spring garden and yard clean-up checklists for you to use.
I’ll also give you a tonne of advice on when and how to do things like spring cleaning in your garden.
How Do You Clean Up A Garden?
Cleaning up a garden involves several tasks to maintain its appearance and health. Here’s a step-by-step guide on how to clean up a garden:
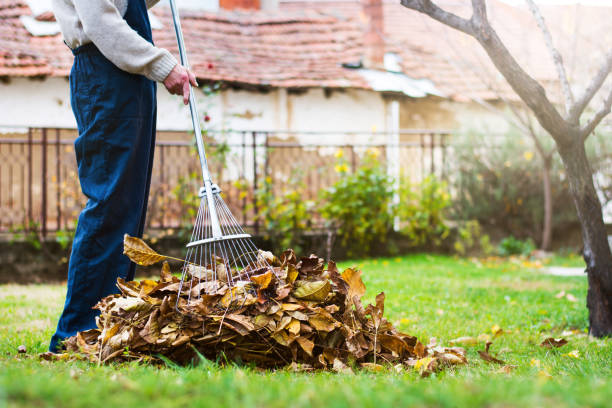
1. Remove Debris
To remove debris from your garden, follow these steps:
- Gather necessary tools: Get a rake, leaf blower, or garden broom to help you collect and move debris efficiently. You may also need a garden waste bag or a wheelbarrow for easy transport.
- Start with the larger debris: Begin by picking up larger objects like branches, fallen limbs, or large rocks. Place them aside or directly into the garden waste bag or wheelbarrow.
- Rake or blow leaves: If your garden has a lot of fallen leaves, use a rake to gather them into piles. Work systematically, starting from one side of the garden and moving towards the other. Alternatively, you can use a leaf blower on a low setting to gather the leaves into manageable piles.
- Collect the smaller debris: Once you have cleared the larger debris and leaves, use the rake or a garden broom to collect smaller debris like twigs, pinecones, or small rocks. Ensure you cover all areas, including garden beds, pathways, and around plants.
- Dispose of the debris: Transfer the collected debris into a garden waste bag or a wheelbarrow. If possible, consider composting organic materials like leaves and small plant trimmings. If not suitable for composting, dispose of the debris according to your local waste management guidelines.
- Check hidden areas: Don’t forget to check hidden areas such as under shrubs, behind structures, or along fences, as debris may have accumulated there. Use a rake or broom to clear these areas as well.
- Sweep or hose down hard surfaces: If you have paved areas or decks in your garden, sweep or use a leaf blower to clear any debris from these surfaces. You can also hose them down to remove dirt or stubborn debris.
Regularly removing debris from your garden not only improves its appearance but also prevents pests, diseases, and fungal growth. It allows plants to receive adequate sunlight, water, and nutrients while reducing the risk of slips and falls.
2. Prune And Trim Plants
Pruning and trimming plants is an essential part of garden maintenance. It helps promote healthy growth, control size, and enhance the overall appearance of plants. Here are the steps to prune and trim plants effectively:
- Identify the plants to prune: Determine which plants require pruning. Focus on shrubs, trees, and perennial plants that have overgrown dead, damaged, or crossing branches. Consider the plant’s growth habit, flowering time, and specific pruning requirements.
- Use the right tools: Gather the appropriate tools for pruning. These may include pruning shears (secateurs) for small branches, loppers for thicker branches, and a pruning saw for larger limbs. Ensure your tools are clean, sharp, and in good working condition.
- Remove dead or diseased branches: Begin by cutting off any dead, diseased, or damaged branches. These can be identified by their lack of foliage, discolouration, or signs of disease or decay. Make clean cuts just above the branch collar (the swollen area where the branch meets the trunk or main branch).
- Prune crossing or rubbing branches: Look for branches that are crossing or rubbing against each other. Choose the healthier or more desirable branch and remove the other one. Cut back to a healthy side branch or back to the main stem, cutting at a slight angle.
- Thin out overcrowded growth: If a plant has become overly dense or crowded, selectively remove some of the branches to improve airflow and light penetration. Thin out the interior branches, focusing on removing weak or crossing branches, while maintaining the plant’s natural shape.
- Shape and size control: Trim plants to maintain their desired shape and size. Use pruning shears or loppers to cut back branches to an outward-facing bud or lateral branch. Avoid cutting into the main stem unless necessary for shaping purposes. Step back occasionally to assess the plant’s appearance and make adjustments as needed.
- Consider flowering plants: When pruning flowering plants, be mindful of their blooming time. Some plants flower on old wood (previous year’s growth), while others bloom on new wood (current year’s growth). Prune accordingly to avoid removing flower buds.
- Clean up and disposal: As you prune, collect the pruned branches and debris and dispose of them properly. Cut branches into manageable sizes for disposal or consider using them for composting or mulching if appropriate.
- Repeat regularly: Pruning is an ongoing process, so make it a regular part of your garden maintenance. Different plants have different pruning requirements, so refer to specific guidelines for each plant type to ensure proper timing and techniques.
Remember to research specific plants to understand their unique pruning needs. Some plants may require special pruning techniques or prefer to be pruned at specific times of the year. When in doubt, consult gardening resources or seek advice from local horticultural experts.
3. Weed Removal
Weed removal is an essential task in garden maintenance to prevent weeds from competing with desirable plants for nutrients, water, and sunlight. Here’s a step-by-step guide on how to remove weeds effectively:
- Identify the weeds: Learn to identify different types of weeds in your garden. Common weeds include dandelions, crabgrass, chickweed, and broadleaf weeds. Understanding their growth habits and characteristics will help you choose the most appropriate removal methods.
- Choose the right time: Plan weed removal when the soil is moist. Weeds are easier to remove when the soil is damp, making it simpler to pull out the entire root system. Avoid removing weeds during dry periods, as the soil may be compacted and the weeds are more likely to break off, leaving the roots behind.
- Hand-pulling: For small areas or individual weeds, hand-pulling can be effective. Put on gardening gloves and get down to the root level. Grasp the weed close to the base and gently pull it out, ensuring you remove the entire root system. Pulling at a slight angle can help loosen the roots.
- Use a weeding tool: For larger areas or persistent weeds, consider using a weeding tool such as a hand cultivator, dandelion digger, or a long-handled weeder. Insert the tool into the soil near the weed’s base and apply leverage to lift the weed and its roots out of the ground.
- Hoeing or cultivating: If you have a larger area affected by weeds, a hoe or cultivator can be useful. Use a hoe to skim just beneath the soil surface, severing the weeds from their roots. This method is effective for annual weeds but may not be suitable for perennial weeds with deep roots.
- Mulching: Prevent weed growth by applying a layer of mulch around desirable plants. Mulch blocks sunlight, inhibiting weed germination and growth. Use organic mulch such as wood chips, straw, or shredded leaves. Apply a layer around 2-3 inches thick, keeping it a few inches away from plant stems to prevent moisture-related issues.
- Chemical control: If weeds are persistent or widespread, you may consider using herbicides as a last resort. Select an appropriate herbicide labelled for the specific weed problem and follow the instructions carefully. Be mindful of potential risks to desired plants and the environment, and use herbicides sparingly and responsibly.
- Regular maintenance: Consistent weed management is crucial to prevent future weed growth. Regularly inspect your garden for new weed growth and promptly remove them before they become established. Mulch regularly, maintain healthy plants, and practice good garden hygiene to reduce weed problems.
Remember, it’s important to positively identify weeds and avoid accidentally removing desirable plants. Prioritize manual or non-chemical methods of weed removal, but if herbicides are used, follow the product instructions closely to ensure safe and effective application.
4. Clean Flower Beds
Cleaning flower beds is an important task to keep your garden looking tidy and to promote the health of your plants. Here’s a step-by-step guide on how to clean flower beds effectively:
- Remove dead flowers and plants: Start by removing any dead flowers, spent blooms, or plants that have finished their lifecycle. Cut back the stems to the base or just above a healthy set of leaves. Dispose of the removed plant material in a compost bin or garden waste bag.
- Trim back perennial plants: If you have perennial plants that have become overgrown or have excessive foliage, trim them back to a manageable size. Use pruning shears or hand pruners to cut back the stems, ensuring you maintain the plant’s natural shape. Remove any dead or diseased portions as well.
- Weed removal: Carefully inspect the flower beds for any weeds that have sprouted. Remove them by hand, ensuring you pull out the entire root system to prevent regrowth. Use a hand weeder or small garden trowel to assist in weed removal if needed. Be cautious not to disturb the roots of desired plants.
- Clear out debris: Rake or use a garden broom to clear away any fallen leaves, twigs, or other organic debris from the flower beds. This will help improve the appearance of the beds and prevent the accumulation of moisture that could lead to plant diseases.
- Divide and transplant as needed: If your flower beds have overcrowded plants, it may be necessary to divide and transplant them. Carefully dig up the crowded plant, separate it into smaller sections, and replant them in appropriate spaces within the bed or other areas of the garden.
- Loosen the soil: Use a garden fork or a hand cultivator to gently loosen the soil in the flower beds. This helps improve aeration and water penetration, promoting healthier root growth. Avoid disturbing the roots of established plants while loosening the soil.
- Apply mulch: Spread a layer of organic mulch around the flower beds. Mulch helps suppress weed growth, retain soil moisture, and regulate soil temperature. Apply the mulch to a depth of 2-3 inches, ensuring you keep it a few inches away from the base of plants to prevent moisture-related problems.
- Water and fertilize: After cleaning the flower beds, water the plants thoroughly, especially if you disturbed the roots during the process. Consider applying a balanced slow-release fertilizer according to the specific needs of your plants, following the manufacturer’s instructions.
- Maintain regular care: Keep an eye on your flower beds regularly and perform maintenance tasks as needed. Remove weeds promptly, deadhead flowers to encourage continued blooming, and adjust watering and fertilizing routines based on the needs of your plants.
By regularly cleaning and maintaining your flower beds, you can create an attractive and healthy garden space for your plants to thrive.
5. Mulching
Mulching is a beneficial practice that involves applying a layer of material on the soil surface around plants. It offers numerous advantages for plant health, weed suppression, moisture retention, and soil improvement. Here’s a guide on how to mulch effectively:
- Choose the right mulch material: Select an appropriate mulch material based on your specific needs and the plants in your garden. Common organic mulch options include wood chips, straw, shredded leaves, compost, or pine needles. Inorganic mulches like gravel or stones can also be used for certain areas.
- Prepare the area: Before applying mulch, clear the area of any weeds, debris, or excessive plant material. It’s best to weed and water the area beforehand to ensure a clean and moist surface for mulch application.
- Determine the mulch depth: The ideal mulch depth depends on the material used and the purpose of mulching. For most organic mulches, a layer of 2-4 inches is recommended. However, avoid piling mulch directly against the stems or trunks of plants to prevent moisture-related issues or rot.
- Apply the mulch: Spread the mulch evenly over the soil surface, covering the desired area. Use a rake or garden fork to spread it out and ensure a consistent layer. Take care to leave a gap around the base of plants to prevent moisture buildup and potential pest or disease issues.
- Mulch around trees and shrubs: When mulching around trees or shrubs, create a doughnut-shaped ring of mulch rather than piling it against the trunk. Start a few inches away from the trunk and extend the mulch layer outward to cover the root zone. This promotes healthier root growth and protects against mechanical damage.
- Replenish mulch as needed: Over time, organic mulches break down and decompose. As they do, their effectiveness diminishes, and they may need replenishing. Check the mulch layer periodically and add more as necessary to maintain the desired depth and coverage.
- Consider seasonal adjustments: In areas with distinct seasons, you may need to adjust your mulching practices. In colder regions, a thicker layer of mulch can provide insulation and protect plant roots from freezing temperatures. In hot climates, a lighter layer can help moderate soil temperature and prevent excessive moisture loss.
- Monitor and maintain: Regularly monitor the mulched areas for any signs of weed growth, pest infestations, or plant diseases. Remove any weeds that manage to emerge through the mulch promptly. Monitor soil moisture levels and adjust watering as needed, as mulch helps retain moisture in the soil.
Mulching is an ongoing practice, and regular maintenance is essential. It’s recommended to replenish mulch annually or as needed based on its condition and effectiveness. By mulching consistently, you can create a healthier growing environment for your plants, reduce weed competition, conserve moisture, and enhance the overall appearance of your garden.
6. Lawn Care
Proper lawn care is essential for maintaining a healthy, vibrant, and attractive lawn. Here are some important steps to follow for effective lawn care:
Mowing:
- Set your mower blades to the appropriate height based on the grass species. Generally, cool-season grasses should be mowed to a height of 2.5 to 4 inches, while warm-season grasses are typically cut shorter.
- Avoid cutting more than one-third of the grass height at a time to prevent stress and damage.
- Regularly sharpen your mower blades for clean cuts and healthier grass.
Watering:
- Water your lawn deeply and infrequently to encourage deep root growth.
- Water early in the morning to minimize evaporation and allow the grass to dry before evening, reducing the risk of fungal diseases.
- Aim for around 1 inch of water per week, including rainfall. Using a rain gauge or empty tuna can measure the amount of water applied.
Fertilizing:
- Apply fertilizers based on the needs of your specific grass type. Follow the instructions on the fertilizer package and apply it evenly to avoid burning the grass.
- Consider using slow-release fertilizers for gradual nutrient release and better long-term results.
- Fertilize during the active growing season, typically in spring and fall for cool-season grasses, and summer for warm-season grasses.
Weed Control:
- Prevent weeds by maintaining a healthy, thick lawn through proper mowing, watering, and fertilizing.
- Spot-treat weeds with herbicides if necessary, using products suitable for your grass type. Follow the instructions carefully and consider using selective herbicides that target specific weeds while minimizing harm to the grass.
Aeration:
- Aerating the lawn helps improve soil compaction and allows better air, water, and nutrient penetration to the roots.
- Use a manual or mechanical aerator to create small holes in the soil, typically in the spring or fall.
- Overseed the lawn after aeration to fill in bare patches and promote thicker grass growth.
Dethatching:
- Thatch is a layer of dead grass, roots, and debris that accumulates between the grass blades and soil. Excessive thatch can hinder water and nutrient absorption.
- If the thatch layer exceeds 0.5 inches, dethatch the lawn using a dethatching rake, power rake, or vertical mower. Take care not to damage the grassroots.
Pest and Disease Management:
- Monitor your lawn for signs of pests such as grubs, chinch bugs, or lawn diseases.
- Practice good cultural practices like proper mowing, watering, and fertilizing to maintain a healthy lawn that is more resistant to pests and diseases.
- If necessary, use targeted treatments or consult with a professional to address specific pest or disease issues.
Regular Maintenance:
- Regularly remove leaves, debris, and grass clippings from the lawn to prevent suffocation and fungal growth.
- Trim the edges of the lawn along sidewalks, driveways, and flower beds to maintain a neat appearance.
- Repair any bare patches by overseeding and keeping the area consistently watered until the grass fills in.
By following these lawn care practices, you can help your lawn thrive, improve its appearance, and create an inviting outdoor space. However, keep in mind that specific lawn care requirements may vary based on your region, grass type, and local climate conditions.
7. Clean Garden Structures
Cleaning garden structures, such as fences, pergolas, arbours, and statues, can help maintain their appearance and extend their lifespan. Here’s a step-by-step guide on how to clean garden structures effectively:
- Assess the structure: Before cleaning, assess the condition of the garden structure. Check for any loose or damaged parts that may need repair or replacement. It’s best to address any structural issues before proceeding with cleaning.
- Remove loose debris: Start by removing any loose debris, such as leaves, cobwebs, or dirt, from the surface of the structure. Use a broom, brush, or leaf blower to gently sweep away the debris.
- Wash with water: For general cleaning, you can start by using water. If the structure is small, a garden hose with a spray nozzle attachment can be sufficient. Spray water over the surface to rinse off dirt and grime. Use a gentle pressure setting to avoid damaging delicate surfaces.
- Use a mild cleaning solution: For tougher stains or stubborn dirt, you can create a mild cleaning solution. Mix warm water with a mild dish soap or a gentle detergent. Avoid using harsh chemicals that may damage the structure or harm nearby plants.
- Scrub or brush: Dip a soft-bristled brush or sponge into the cleaning solution and gently scrub the surface of the structure. Pay extra attention to areas with stains or buildup. Use gentle circular motions to avoid scratching the surface. If there are intricate details, use a soft toothbrush or a small brush to reach into crevices.
- Rinse thoroughly: After scrubbing, rinse the structure thoroughly with clean water to remove any soapy residue. Make sure to rinse from top to bottom to prevent streaking. Use a garden hose or a bucket of water to rinse off the cleaning solution.
- Dry the structure: Allow the garden structure to air dry naturally in the sunlight. If possible, let it dry completely before using or applying any protective coatings.
- Apply protective treatments (optional): Depending on the type of garden structure, you may consider applying protective treatments. For wooden structures, you can apply a sealant, stain, or paint to protect them from weathering and prolong their lifespan. Follow the manufacturer’s instructions and choose products suitable for the specific material of your structure.
- Regular maintenance: To keep garden structures clean and in good condition, incorporate regular maintenance. Remove debris, check for any signs of damage or wear, and clean as needed throughout the year. Regular maintenance will help prevent excessive dirt buildup and make future cleaning tasks easier.
Remember to prioritize safety when cleaning garden structures. Wear protective gloves, safety glasses, and appropriate clothing. Take care not to damage delicate or intricate parts while cleaning. If you are uncertain about the cleaning methods for a specific structure, consult the manufacturer’s guidelines or seek professional advice.
8. Tool Maintenance
Proper tool maintenance is crucial to keep your garden tools in good working condition, ensure their longevity, and promote efficient and safe use. Here are some essential tips for maintaining your garden tools:
Cleaning:
- After each use, remove any dirt, mud, or debris from your tools. Use a stiff brush, scraper, or hose to clean off the accumulated grime.
- For stubborn residue, you can use a solution of water and mild dish soap. Scrub the tool surfaces with a brush or sponge, then rinse thoroughly and dry.
- Pay special attention to removing any moisture, as it can lead to rust and corrosion. Wipe the tools dry with a clean cloth or towel before storing them.
Sharpening:
- Regularly inspect the cutting edges of your tools, such as pruners, shears, and shovels. Dull blades make gardening tasks more difficult and can damage plants.
- Use a sharpening tool appropriate for the specific tool. For example, pruners and shears can be sharpened with a sharpening stone or a handheld file, while shovels and hoes may require a file or grinder.
- Follow the manufacturer’s instructions or seek guidance on the correct sharpening technique for each tool. Maintain the original angle of the blade while sharpening to ensure optimal cutting performance.
Lubrication:
- Apply lubricant or oil to the moving parts of your tools, such as hinges, joints, and pivot points. Lubrication helps prevent rust, corrosion, and friction, ensuring smooth operation.
- Use a lubricating oil suitable for outdoor tools and apply it sparingly. Wipe off any excess oil after application.
- Pay attention to tools with wooden handles, as they may benefit from occasional coating with linseed oil or a specialized wood preservative to maintain their integrity.
Rust prevention:
- Rust can damage the metal components of your tools. To prevent rust:
- Keep your tools dry and store them in a clean, dry location. Avoid leaving them outside where they can be exposed to moisture.
- If you notice any signs of rust, remove it with steel wool or a wire brush. Apply a rust-inhibiting spray or a thin layer of oil to protect the metal surfaces.
- Consider storing your tools with a moisture-absorbing material, such as silica gel packets or a bucket of dry sand, to help reduce humidity in the storage area.
Handle maintenance:
- Inspect the handles of your tools regularly for signs of wear, cracks, or splinters. Replace any damaged handles to ensure safe and comfortable use.
- Sand rough or splintered wooden handles and apply a protective finish, such as linseed oil or varnish, to prolong their lifespan and improve grip.
Storage:
- Proper storage is essential for tool maintenance. Store your tools in a clean, dry, and well-ventilated area, preferably in a shed, garage, or tool rack.
- Hang or store your tools in a way that prevents them from banging into each other, which can cause damage or dulling of cutting edges.
- Organize your tools to make them easily accessible and minimize clutter, allowing you to find the right tool for the job efficiently.
By following these maintenance practices, you can extend the life of your garden tools and ensure they perform optimally whenever you need them. Regular cleaning, sharpening, lubrication, rust prevention, and proper storage will contribute to the longevity and effectiveness of your tools.
9. Assess And Plan
Assessing and planning are essential steps in maintaining and improving your garden. Here’s a guide on how to assess your garden and create an effective plan:
Evaluate Your Current Garden:
- Take a walk around your garden and observe its current state. Note the overall layout, existing plants, structures, and features.
- Assess the health and condition of plants, identifying any diseases, pests, or nutrient deficiencies.
- Evaluate the functionality and aesthetic appeal of the garden, considering factors like access, seating areas, pathways, and focal points.
Determine Your Goals:
- Identify your goals and priorities for the garden. Do you want to enhance its beauty, create a more functional space, grow specific plants, attract wildlife, or improve sustainability?
- Consider factors like maintenance requirements, budget, and your personal preferences in terms of plant types, colours, and themes.
Consider The Site And Environmental Factors:
- Understand the environmental conditions of your garden, including the amount of sunlight, soil type, drainage, and microclimates.
- Take note of any specific challenges or opportunities presented by the site, such as slopes, existing trees, or areas prone to erosion or waterlogging.
- Consider the local climate and its impact on plant selection, water needs, and seasonal variations.
Plan For Plantings:
- Determine which plants are suitable for your garden based on the site conditions and your goals. Consider factors like sun and shade requirements, water needs, soil pH, and hardiness zones.
- Plan for a mix of plant types, including trees, shrubs, perennials, annuals, and ground covers, to provide visual interest throughout the year.
- Consider the layout and arrangement of plants, ensuring proper spacing and complementary colours, textures, and heights.
- Take into account the growth characteristics of plants, allowing sufficient space for their mature size and considering factors like spread, height, and root systems.
Design And Structure:
- Incorporate design elements into your garden, such as paths, seating areas, focal points, or garden structures like trellises or water features.
- Plan for the placement of structures and features, considering functionality, aesthetics, and their relationship with the existing landscape.
- Think about the flow and organization of spaces, creating zones or areas for specific purposes, such as entertaining, gardening, or relaxation.
Consider Maintenance And Sustainability:
- Evaluate the maintenance requirements of your garden and plan accordingly. Choose plants that are suitable for your available time and resources.
- Incorporate sustainable practices, such as water-efficient irrigation systems, the use of native or drought-tolerant plants, composting, and mulching to reduce water usage and improve soil health.
Create A Timeline And Budget:
- Break down your garden plan into actionable steps and create a timeline for implementation. Consider seasonal factors and prioritize tasks accordingly.
- Estimate the budget required for implementing your plan, including plant purchases, materials, tools, and any professional assistance you may need.
Execute And Adapt:
- Start implementing your garden plan systematically, considering the timeline, budget, and available resources.
- Monitor the progress of your garden and be open to making adjustments as needed. Gardening is an ongoing process, and flexibility is key to adapting to changing conditions and evolving goals.
Remember to take photographs or sketch your garden layout to help visualize your plan. Gardening is a creative and rewarding endeavour, and thorough assessment and planning will set the foundation for a successful and enjoyable garden space.
Conclusion
In conclusion, maintaining and improving your garden requires careful assessment and planning. By evaluating the current state of your garden, setting goals, considering site conditions, planning for plantings, incorporating design elements, prioritizing maintenance and sustainability, creating a timeline and budget, and executing your plan, you can create a beautiful and functional garden space.
Assessing your garden allows you to understand its strengths and weaknesses, identify areas for improvement, and make informed decisions about plant selection, layout, and design. Planning helps you set clear goals, prioritize tasks, and allocate resources effectively. It also allows you to consider factors like site conditions, environmental considerations, maintenance requirements, and sustainability practices.
Through a well-thought-out plan, you can create a garden that suits your needs, reflects your personal preferences, and enhances the beauty and functionality of your outdoor space. Regular maintenance and monitoring will ensure the long-term success of your garden, allowing you to adapt and make adjustments as necessary.
Remember that gardening is a continuous learning process, and it’s okay to experiment, make mistakes, and evolve your garden over time. Enjoy the journey of creating and maintaining your garden, and savour the rewards of a beautiful and thriving outdoor sanctuary.
If you are up to garden clean up melbourne visit Must Have Maintenance.


Leave a Reply